Like me, the more you photograph, the more your collection of photos grows, resulting in multiple catalogs of images. Sometimes, I feel like taking a day off just to have time to sort through all these catalogs. So, I searched for the right tool and method. Today, I’m sharing with you the secrets of “photo culling” and my selection of tools to speed up the process of selecting the best photos.
In short, the so-called “photo culling” method can be described as a qualitative sorting of photos since it involves selecting the best images from a session to be edited later. Do you need to choose the best shots for your client? Want to post your latest shoot on Instagram? Print your family photos? Create an album of your recent vacation? Whatever the purpose, good photo culling can make a huge difference and highlight your best shots.
What is Photo Culling?
Photo culling is a crucial step in post-processing for photographers, whether amateur or professional. This process involves selecting the best images from a photo session, those that will be edited and eventually delivered to clients. The goal is to perfect the images, either by modifying them or eliminating those that do not meet expectations.
In situations where the number of shots is very high, such as in wedding photography, this task can quickly become extremely tedious. Eliminating blurry photos or those where subjects have their eyes closed can take considerable time, even before starting the actual post-processing.
Tools (see below in the article) can greatly facilitate this task. They visually mark failed photos using a system of colored flags, allowing photographers to save time by quickly identifying images to eliminate. Unlike plugins like Peakto Search and Excire, which focus more on searching photos within a catalog based on criteria such as theme, keywords, or colors, these tools help eliminate failed photos.
Thus, good photo culling is not just about randomly deleting a few photos. It requires skills and an optimized workflow to be effective. Choosing the best photo editing software is therefore crucial to optimize this process and achieve exceptional photos.
Why Adopt This Photo Culling Method?
If I take wedding photography as an example, photo culling is a crucial step for any professional photographer, especially for this type of photo shoot which generates thousands of shots. Photo culling allows :
- Quickly eliminate low-quality images at the start of your workflow
- Optimize your editing time with initial sorting
- Achieve rapid results (goodbye to hours spent manually deleting failed shots)
This method is also important to maximize clarity. In photography, it cannot be underestimated. A clear and sharp image is essential to attract attention and capture details. Even with good capture techniques, post-processing plays a crucial role in improving the sharpness and clarity of photos.
What Process to Adopt for Effective Manual Photo Culling?
First of all, photo culling starts with deleting failed photos and duplicates. Make sure to finalize this sorting before starting the editing, as it would be pointless to edit photos that might be eliminated later.
Next, I recommend using marking tools to easily find specific photos. Various types of classification are available:
- Metadata: name, place, and time
- Color codes: designate which photos you want to keep or reject
- Star rating: a one-star rating could indicate a lower rating, while five stars could signify a top choice
As you go through these steps, you will develop your own process and refine your method. Each session will help you acquire new skills. You will discover tips and tricks that will speed up the sorting process, allowing you to create an optimal and personalized workflow.
What is AI Photo Culling? Is there an AI that Chooses Best Photos?
Manual photo culling has its limits, especially when dealing with hundreds of photos. I once finished a photo session with 700 photos, and when it came to sorting and editing, it’s normal to feel frustrated and lack motivation (and time). You start manually sorting your photos, find one you like, spend a few minutes editing it, then resume sorting until you find another photo to edit, and so on. This process is obviously counterproductive and quickly becomes time-consuming.
Whether you are a professional or an amateur, if you want to sort and edit a large number of images, you must manage your post-production efficiently and productively. My ultimate solution is to invest in software that will save you time and increase your revenue (if it’s a professional activity).
This software is Peakto, and it is equipped with artificial intelligence that simplifies your workflow. AI in photo culling helps in several ways: general management, sorting, searching, and editing. Thus, Peakto assists you with the two key stages of photo culling: sorting by deletion and editing, thanks to its compatibility with major photo editing tools on the market.
Peakto's AI Helps You Quickly and Efficiently Sort Your Thousands of Photos
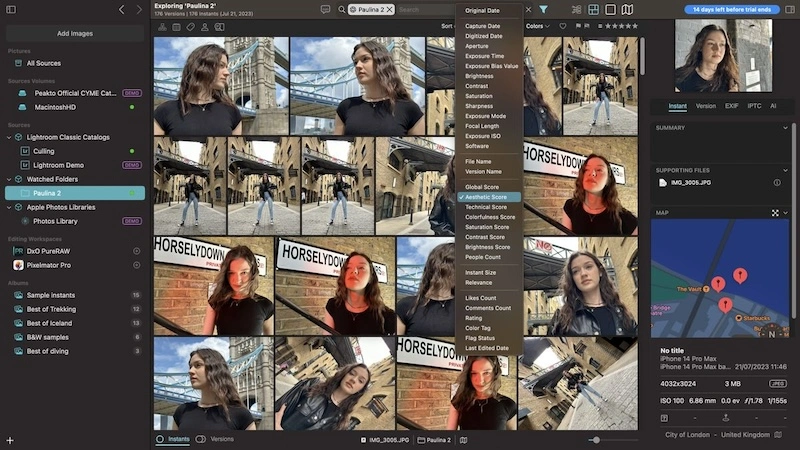
With its AI, Peakto helps you quickly and efficiently sort your photos. Peakto is a central platform for all your photos. By unifying all your images in one interface, it offers unique perspectives on your best shots, while simplifying the management of thousands of scattered photos: centralized search, cross-application annotations, and dynamic album creation from multiple sources.
With its AI, it automates the assignment of keywords and categories, allowing you to find any photo from a simple description. A real photo assistant that saves time for all photography enthusiasts.
Deleting Low-Quality Images and Duplicates with Peakto
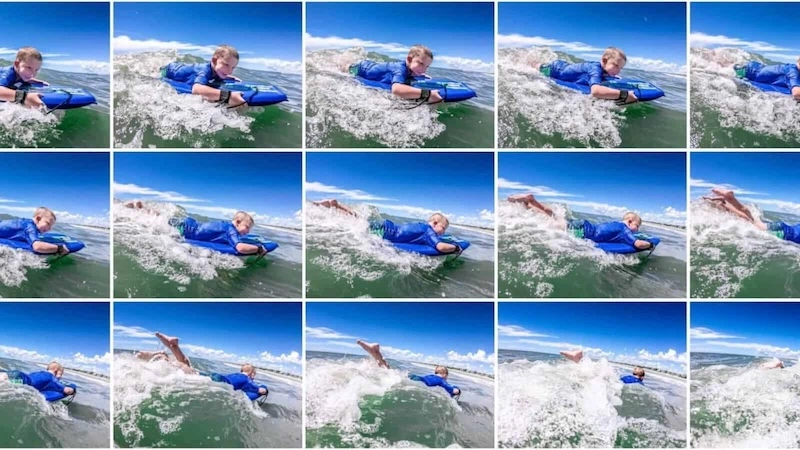
A new feature in Peakto is centralized deletion. It allows you to clean your entire photo library in one operation. Capable of unifying thousands of images scattered across various folders, hard drives, and editing applications, Peakto makes it easy to declutter photo collections. In terms of photo culling, AI is crucial as it automatically identifies screenshots, blurry, overexposed, or underexposed photos. By comparing all versions of an image and automatically classifying undesirable photos, Peakto becomes the ideal central point to clean all your images and free up space on your devices.
Which Tools to Use for Successful Photo Culling?
Adobe Lightroom, the Favorite Management and Editing Tool for Photo Professionals
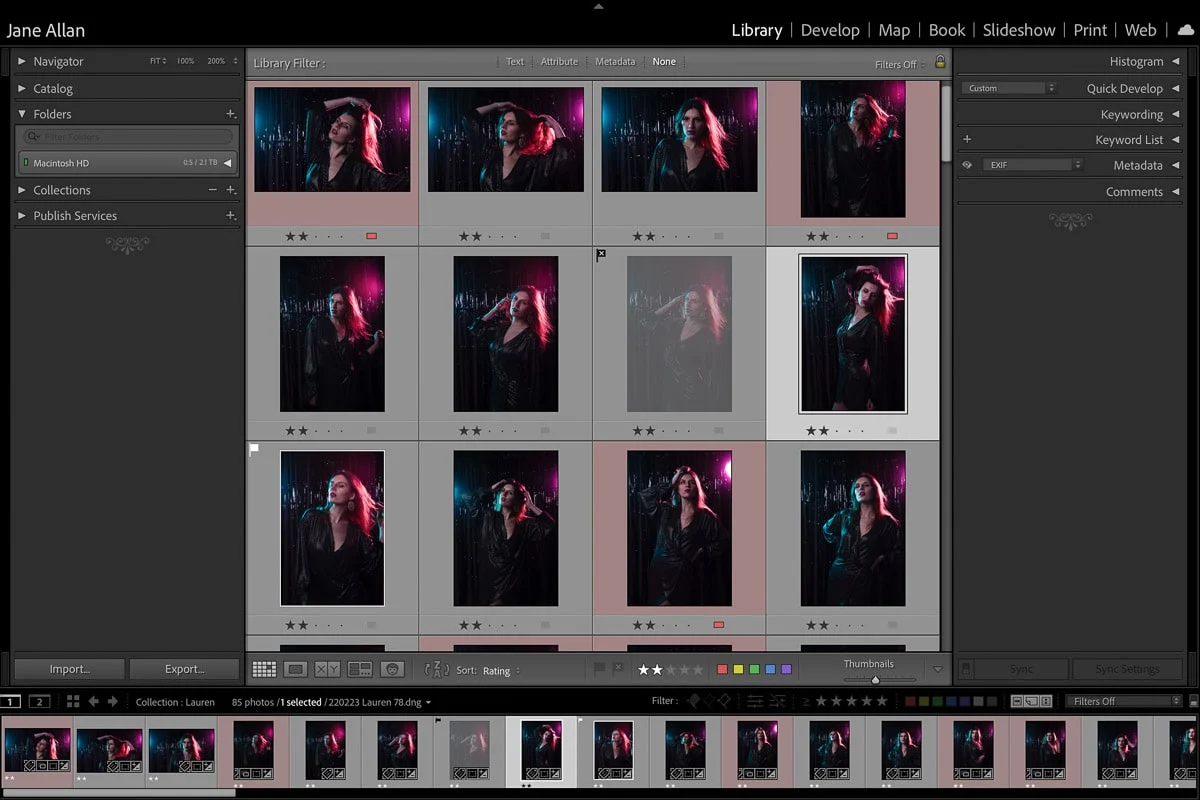
Adobe Lightroom needs no introduction; it is a well-known and recognized software among photographers. While there are many alternatives, Lightroom remains the leader thanks to its digital asset management (DAM) features and its wide range of editing tools. Regarding photo culling, Lightroom is a practical tool for sorting photos, provided you have a powerful computer (lots of RAM) to start sorting photos during import. In reality, Lightroom was not specifically designed for photo culling; it was created to be an image editor. That said, it can also help you sort, create slideshows, and print your photos.
Its main advantage is a multitude of options to add metadata, labels, and keywords to images. To fully enjoy this Adobe-designed tool, I recommend coupling it with compatible photo management software like Peakto and its Peakto Search plugin.
FilterPixel, the Best Photo Culling Software for Windows
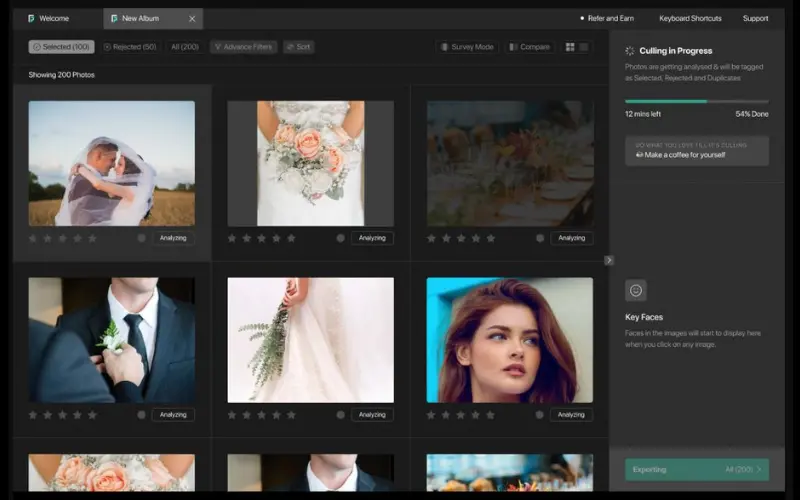
Known for its GPU-powered cloud servers, FilterPixel is an AI-powered desktop application that I have tested and found effective for selecting photos to keep or discard. I always retain full manual control over the selections, but once I trust its capabilities, I can just let it do its job! FilterPixel stands out from other photo culling solutions because of its ability to perform automations far beyond the capabilities of my computer (thanks to its GPU servers). In short, this means that even with a low-powered computer, you can sort your photos since all the heavy lifting is done on FilterPixel’s servers.
What I appreciated about FilterPixel is its compatibility with Lightroom and Photo Mechanic regarding the format of meta files (in .XMP format), so all changes made to photos during culling can still be read without issue. Currently, it is true that the AI is not yet perfect for image filtering, but with continuous advances in AI technology in photography, I am sure it will only improve in the future.

Photo Mechanic, the Fastest Photo Organizer Software Available
Before discovering Peakto, Photo Mechanic seemed incredibly useful to me, and it has been popular among photographers worldwide for years. If you are a professional photographer specializing in sports or wildlife, you likely already use it or at least know it.
What I loved about Photo Mechanic is its ability to ingest thousands of RAW files from multiple memory cards simultaneously. During sorting, it is possible to add captions, keywords, labels, copyrights, and more to images. The photo culling software simplifies all this with keyboard shortcuts for each function.
To access all features, there is Photo Mechanic Plus, which includes the speed of the original version, as well as a powerful image database to index, find, and manage hundreds of thousands of images. What made me switch to Peakto is the absence of AI for photo culling, even though it saves time.
Will You Adopt the Method to Better Manage Your Photo Culling?
Ultimately, mastering the art of photo culling in photography is essential to maintaining quality, saving time, and delivering quality work to clients if it is a professional activity. By following the right method and using the right tools, you can ensure that your post-processing workflow is well-organized and productive. Beyond the financial aspect and time savings, photo culling, or the art of selecting quality photos, allows you to return to the essentials: capturing and creating remarkable images.