
If you’ve been practicing photography for a while, like me, you’ve likely noticed that your photo collection grows rapidly, making it difficult to find specific images. Today, I bring you an effective and simple solution: keyword attribution.
Adding keywords to your images allows you to find photos much more easily, even if they’re buried deep in your archives. Want to share a vacation snapshot on Instagram? Print a family photo? Create a photo book? Using keywords can make a huge difference, especially in terms of saving time.
Contrary to what you might think, opening your photo management software is not always the best solution. Proper keyword entry requires skills and a method to avoid spending hours on it. This is where I come in. As a longtime photographer, I understand how challenging it can be to find effective and varied keywords. In this article, I’ll demystify the entire process, which can sometimes be aided by AI.
What Does Organizing Photos by Keyword Assignment Involve?
Keyword attribution for your photos primarily involves using image management software to tag your images with descriptive text. This way, when you need to find a photo weeks, months, or years later, you won’t have to scroll through endless grids of images. You simply search for the relevant keywords to quickly locate the file.
For example, if you capture an image of a turquoise lake surrounded by mountains and a forest in Italy, you can use your photo software to tag the image with keywords like “Italy”, “forest”, “nature”, “landscape”, “turquoise”, “Lago di braies”, “mountains”, and “boat.”

Next time you want to share this photo on social media or reminisce about that incredible day in the mountains, you just select the appropriate keyword(s) from your list or type them into the search field. Your search will immediately narrow down to a few files, making it easy to find the image.
Note that when you assign keywords to your images using a Digital Asset Management (DAM) software like Digikam, these keywords are not just stored in the software’s database but embedded directly in the image file or stored in an associated sidecar file. This means that even if you change image management software, the keywords you’ve applied will stay with your photos, allowing you to always find what you’re looking for, no matter where your images are cataloged.
Why Using Keywords is Essential for Organizing Photos?
In my early days of photography, my library was manageable, and I knew where each photo was stored. Assigning keywords seemed like an unnecessary extra task, but that was a mistake!
Endless searching for images can be frustrating and have real consequences, especially if it causes you to miss deadlines for urgent photographic projects, whether personal or paid. Fortunately, keywords can reduce or eliminate this risk. By tagging your photos, you can easily find them by recalling a few key details, keeping you efficient in your projects.
Even if you meticulously organize your photos into folders or collections, keywords remain important. They allow for more precise and flexible searches. For example, you can combine keywords and collections to locate images even faster. You might remember storing the photo in a folder titled “Landscape” or “Italian Lakes,” but if you have thousands of landscape photos or have visited the park multiple times, keywords simplify the search.
It’s also worth noting that this tool isn’t just for professional photographers; using keywords greatly facilitates the management and search of all types of images.
How to Add Keywords to a Photo to Organize Your Collection: Step by Step
Once you’ve decided to use keywords to organize your photos, you might be wondering, “How do I add keywords to my photos?”. Like many photographers, I find it helpful to ask several questions when assigning keywords to each image. To illustrate this process, let’s take this photo of a penguin on a beach in South Georgia on the South Sandwich Islands.

Here are the questions that help me assign the right keywords to my photos:
Who?
If there are people or animals in the photo, use their names as keywords. Even if your software uses facial recognition, adding an extra layer of searchability is useful. (In this photo, the penguin doesn’t have a name, but for the example, we can call him “Marco”.)
What?
These keywords often take the most time. Start with the main elements of the photo, then get more specific. Here, “penguin”, “snow”, “beach”, and “mountain” are good choices.
When?
This isn’t about precise dates but general time tags. Was the photo taken during the golden hour or at noon? Seasonal mentions like “winter” or “summer” are also useful. I would use “winter” and “dawn” for my example image.
Where?
Indicate the location. Naming parks, landmarks, or even streets can group photos effectively. Also, think about city, state, and country names for a broader search. In my example, I would use tags like “South Georgia”, “Antarctica”, or “South Sandwich Islands”.
Why?
Was the photo taken for a specific event? Keywords like “expedition”, “research”, or “vacation” can indicate the purpose of the image. Here, the photo was taken during a scientific expedition, so I would use “scientific expedition” and “penguin observation”.
How?
Think about the technique used. Did you use a specific style or lens? Keywords like “macro”, “long exposure”, or “50mm lens” can be very useful. In my example, there’s nothing particular to add.
Color?
Though less common, tagging dominant colors can be useful, especially if you’re looking for images to match a background or a specific color scheme. For my image, “black” for the beach sand and “golden” for the sun rays.
Mood?
This criterion is unconventional but can help find optimistic or gloomy, joyful or sad images. The keyword for the example photo, showing a dominant penguin, would be “surreal”.
I understand this list might seem long, but you can often create batch keywords for several similar photos, avoiding the need to repeat the process for each individual file. As you get used to this method, selecting keywords will become second nature, and you won’t need to refer to the questions directly.
That said, keyword attribution can be tedious and time-consuming. But don’t worry, you can rely on innovation: artificial intelligence.
AI to Help You Assign Keywords to Your Photos and Save Time
Technological advancements offer photographers a new reason to get excited: AI-powered keyword assignment.
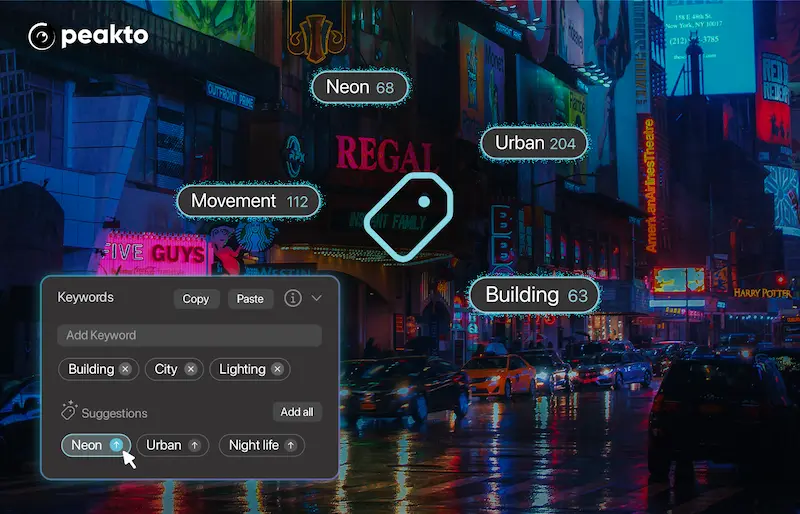
With a tool like Peakto, you simply import your photos, and the software automatically tags them with relevant keywords. You can then modify or add to these keywords as needed. Personally, I have used this software and found it remarkably effective.
Cross-Catalogue Keyword Assignment:
Peakto allows you to add keywords to photos stored in various folders and catalogs, facilitating a coherent and centralized organization.
Automatic Keyword Assignment:
No more tedious manual annotations! Peakto’s AI analyzes your photos and suggests appropriate keywords, saving you valuable time and reducing the effort required.
Batch Annotation:
With Peakto, you can tag multiple photos at once, even if they are scattered in different locations. This feature enhances efficiency by enabling mass annotation in a single step.
Keyword Harmony:
Peakto maintains consistency across all your photos by making it easy to copy and paste keywords. Say goodbye to disorganized catalogs and ensure a homogeneous organization of your collections.
Custom Labels:
If you use specific terms, Peakto allows you to add your own custom keywords, ensuring your labels perfectly fit your unique needs.
Preservation of Existing Keywords:
No need to redo work. Peakto retrieves and integrates keywords from your original catalogs, preserving the work you have already done.
By incorporating these features, Peakto becomes an intelligent photo assistant, unifying all your images in a single interface, making it easier to search and manage thousands of dispersed photos, and transforming the user experience into a significant time saver for photography enthusiasts.
Expert Tips for Keywording
To help you with the keywording process, here are my top tips for smoother and more effective keyword entry:
Add Keywords After Each Photo Session
It’s crucial to add keywords as soon as possible after a photo session. While it might seem like the last thing you want to do after hours of shooting, you’ll thank yourself later. Adding keywords immediately helps you remember key details of the session, which is especially important for specific clients or locations.
Regardless of your photography focus—portrait, landscape, travel, or product photography—make it a rule to apply keywords as soon as possible. Consistency in this habit will save you from a mountain of unpleasant work later.
Hierarchy Your Keywords
A long list of keywords can become disorganized, so it’s essential to structure them hierarchically. This allows you to nest specific keywords within broader categories. For example, for wildlife photography, the general keyword “animal” can contain subcategories like “bird” and “mammal.” Under “mammal,” you can add keywords like “bear,” “wolf,” and “fox,” then specific species under each.
This keeps your keyword list well-organized and intuitive, avoiding confusion. Many image management programs offer this hierarchical feature, facilitating keyword management from broad to specific, making your workflow smoother and more efficient.
Mix Broad and Specific Keywords
By combining specific and general keywords, you can easily access varied sets of photos. For the example of the bald eagle, add terms like “bird of prey,” “bird,” and “wildlife.”
This approach offers greater flexibility in future searches. Whether you need an image of a bird of prey for a project or all your wildlife photos, a mix of broad and specific keywords makes your searches more effective.
Use Batch Keywords Whenever Possible
Manually entering keywords like “portrait,” “summer,” or “sunset” for each photo in a session can be a waste of time. Most image management software, like Peakto, offers a batch keywording option. This allows you to select multiple photos, enter a keyword, and apply it to all selected photos in one click.
While you’ll need to add more specific keywords later, starting with batch keywords lets you focus on unique descriptors without repeating the same words over and over.
Utilize AI Tools to Speed Up the Process
AI for keyword creation is essential. For example, Peakto analyzes your photos and automatically applies precise keywords, even for subtle elements.
Using AI for keyword assignment saves you valuable time, allowing you to focus on photography. Even if errors occur, they are easy to correct, making the entire process more efficient and enjoyable.
Ensure Keyword Consistency
Maintaining keyword consistency is crucial for long-term search effectiveness. Use the same terms, formats (singular/plural, capitalization), and styles consistently to avoid confusion and ensure a homogeneous search experience. For instance, if you use “landscape” for a series of photos, avoid switching to “landscapes” or “Landscape” for others.
Avoid Including Equipment and Settings Information
dding technical details like the camera model, lens, and settings to your keywords is rarely useful. Software like Peakto uses metadata filters to easily find images based on this information.
Keywords should be memorable. You’re more likely to remember a “sunset” than the shutter speed. Use descriptions like “shallow depth of field” instead of technical values like “f/2.8,” as they are easier to search.
Conclusion
Mastering the art of keywording may not provide the same thrill as capturing the perfect photo, but it’s an essential skill for any photographer. Now that you’ve read this article, I hope you’re well-equipped to assign the right keywords to your entire gallery.
Remember: Even if you haven’t annotated your photos, you can find them by precisely describing them thanks to Peakto’s AI, which analyzes image content and can locate them with an accurate prompt. By adopting the right approach and using effective tools like Peakto, you can make the keywording process much more manageable and efficient. Photography isn’t just about the moments you capture; it’s also about being able to find and share those moments with the world!