
When you’re juggling terabytes of footage across drives, NAS volumes, and scattered folders, the real bottleneck isn’t editing — it’s finding the right shots. Peakto turns that painful prep work into a fast, searchable, AI-assisted workflow that saves hours per project and removes friction between teams.
Whether you’re a video editor, a creative director, or a marketing project lead, Peakto becomes your ROI engine for pre-editing: less time searching, more time crafting.
In this guide, you’ll learn how to use Peakto to prep a video, build a subclip-based pre-edit, and hand off a clean timeline to Premiere Pro or DaVinci Resolve — without moving a single file.
Why Use Peakto for Video Pre-Editing?
Peakto acts as an AI media manager that unifies your entire video library — even if it spans multiple hard drives, folders, or NAS volumes.
Key benefits:
- Instantly search through years of footage
- Use AI to find scenes visually, by description or dialogue
- Build fast pre-edits without opening a heavy NLE
- Organize subclips for editors or clients
- Export directly to Premiere Pro or DaVinci Resolve
This is the ideal workflow for editors, content teams, agencies, videographers, and filmmakers who want to start editing faster.
1. Ingest All Your Footage Into Peakto (Once)
Start by connecting Peakto to every location where your videos live:
- Folders on your Mac
- External hard drives
- NAS storage (Synology, QNAP, etc.)
- Editing app catalogs (Lightroom, Apple Photos, etc.)
Once indexed, Peakto creates a unified, AI-searchable media hub. You don’t need to consolidate anything or copy the files. Peakto reads them where they are and builds lightweight proxies so you can preview and search instantly, even when the original drives are offline.
This single ingestion step is the foundation of your entire pre-edit workflow.
2. Find the Perfect Sequence — With AI, Dialogue, or Metadata
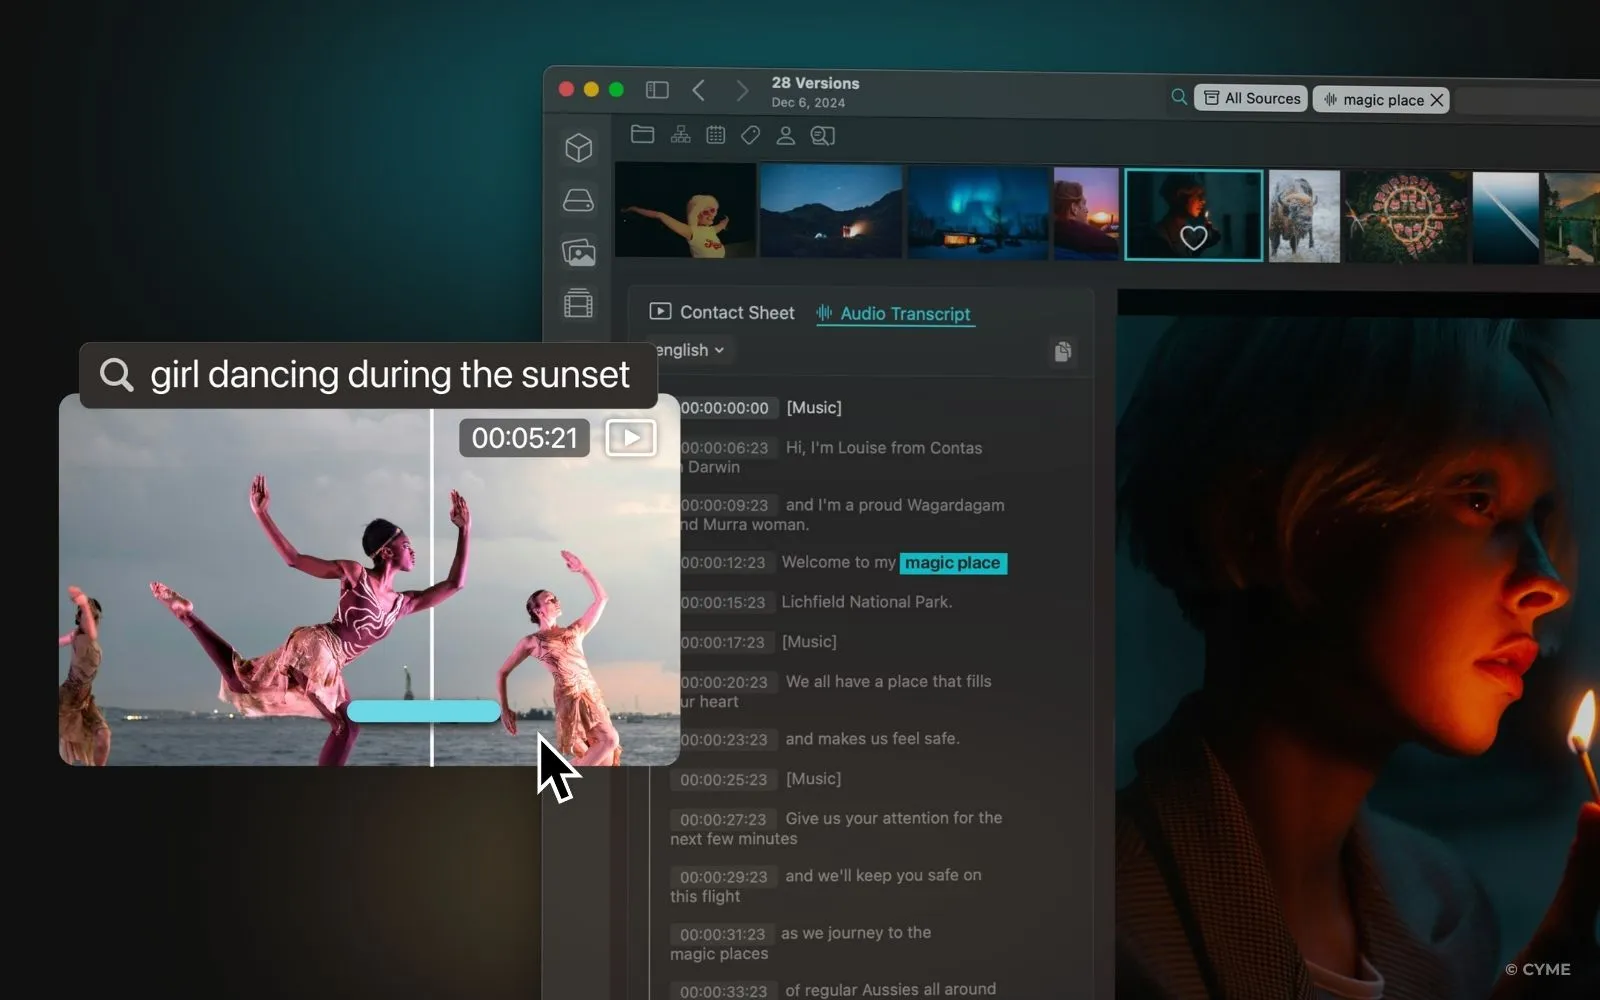
Peakto gives you multiple ways to locate the exact shot you need, even in massive, fragmented archives.
Once indexed, Peakto lets you search across your entire library instantly. You can locate any sequence using several criteria: by description (Peakto’s AI analyzes the visual content of your videos), by dialogue (Peakto automatically generates transcripts for each clip), or through metadata such as GPS coordinates, keywords, or timeline information.
A. Search by Description
Type what you’re looking for — “steady shot of a drone rising above trees,” “close-up of a shoe hitting the ground,” “CEO entering a factory,” etc. Peakto analyzes the visual content of your videos and returns the precise sequences matching the description, frame-accurately.
B. Search by Dialogue
Peakto autonomously generates accurate transcripts for every video. This lets you search for:
- spoken keywords
- moments in interviews
- specific quotes
It’s ideal for long interviews, testimonials, or documentary workflows.
C. Search by Metadata
You can also query:
- GPS coordinates
- Keywords
- Technical metadata (camera model, codec, frame rate)
- Timeline navigation
This makes Peakto extremely powerful for editorial teams with structured archives.
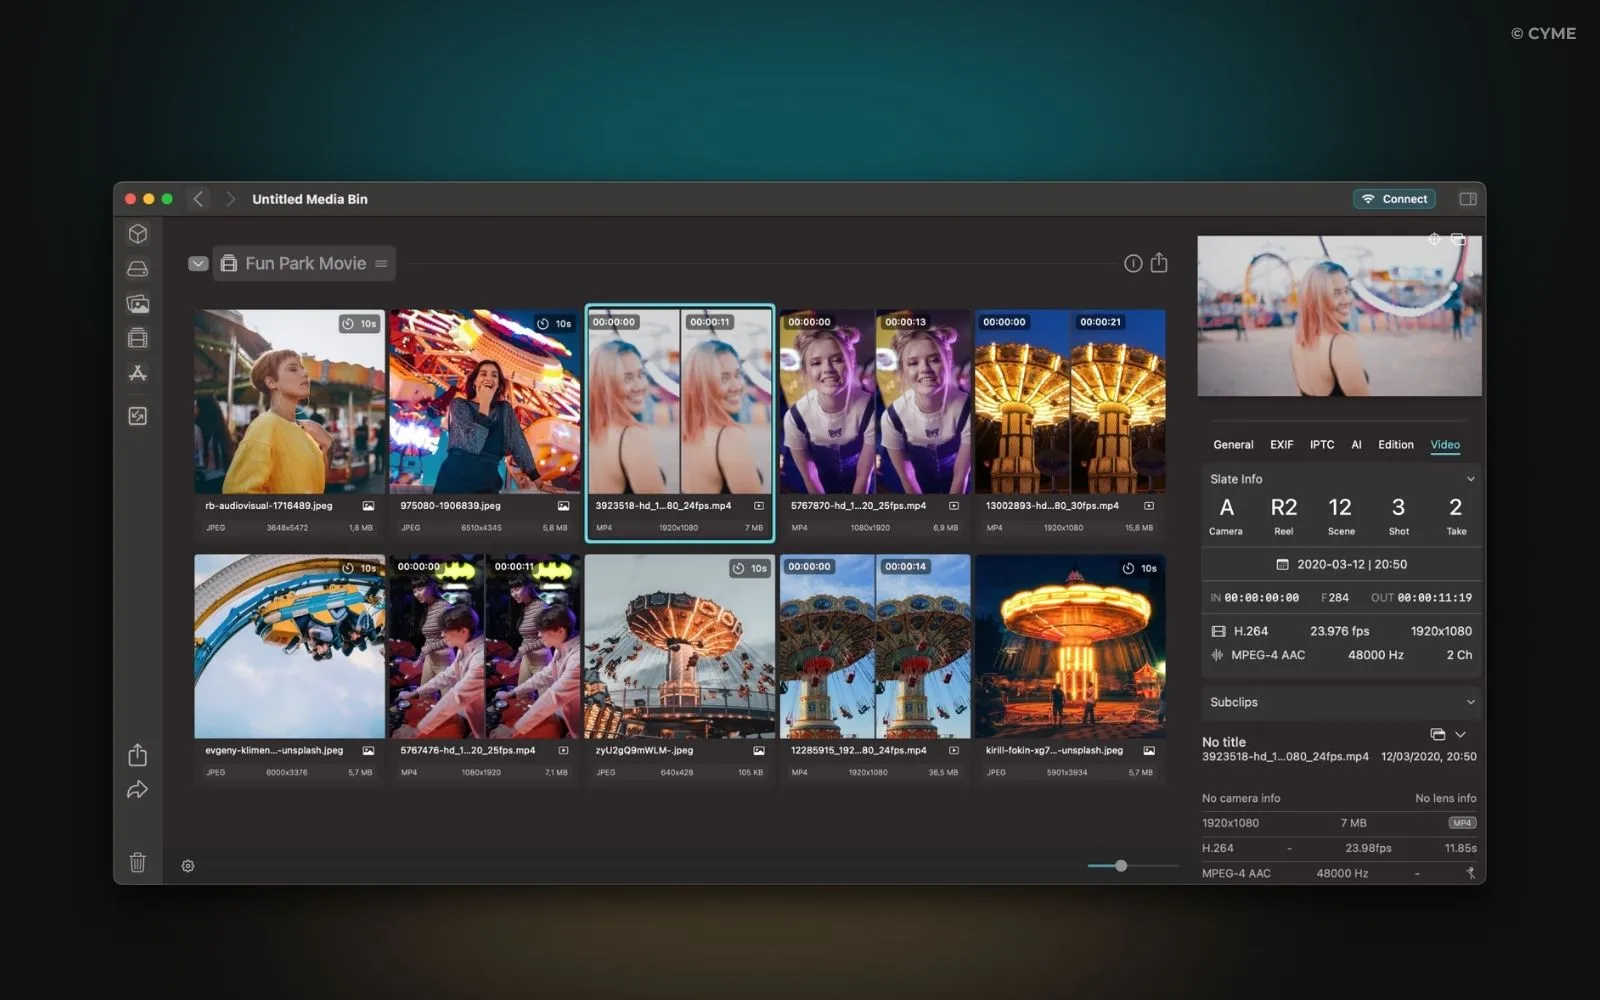
3. Review Proxy Files for Fast Browsing
4. Create Subclips: Define In/Out Points in Seconds
Once you’ve found the right sequence:
- Set In and Out points directly in Peakto.
- Save the subclip.
This allows you to isolate only the relevant portion of a long video — ideal for interviews, events, corporate shoots, and documentary footage.
Subclips preserve the original file, simply referencing the precise timecode range.
5. Add Markers to Tag Critical Shots
6. Build Your “Bin” Inside Peakto
Peakto lets you create collections (similar to bins or folders in NLEs). As you identify subclips and marked segments, drag them into your dedicated pre-edit bin. You can then:
- reorder the elements
- create narrative sequences
- build thematic or story-driven arcs
This becomes your offline pre-montage — sharable, editable, and ready for finishing in a real NLE.
7. Export Your Pre-Edit as a Timeline for Premiere Pro or DaVinci Resolve
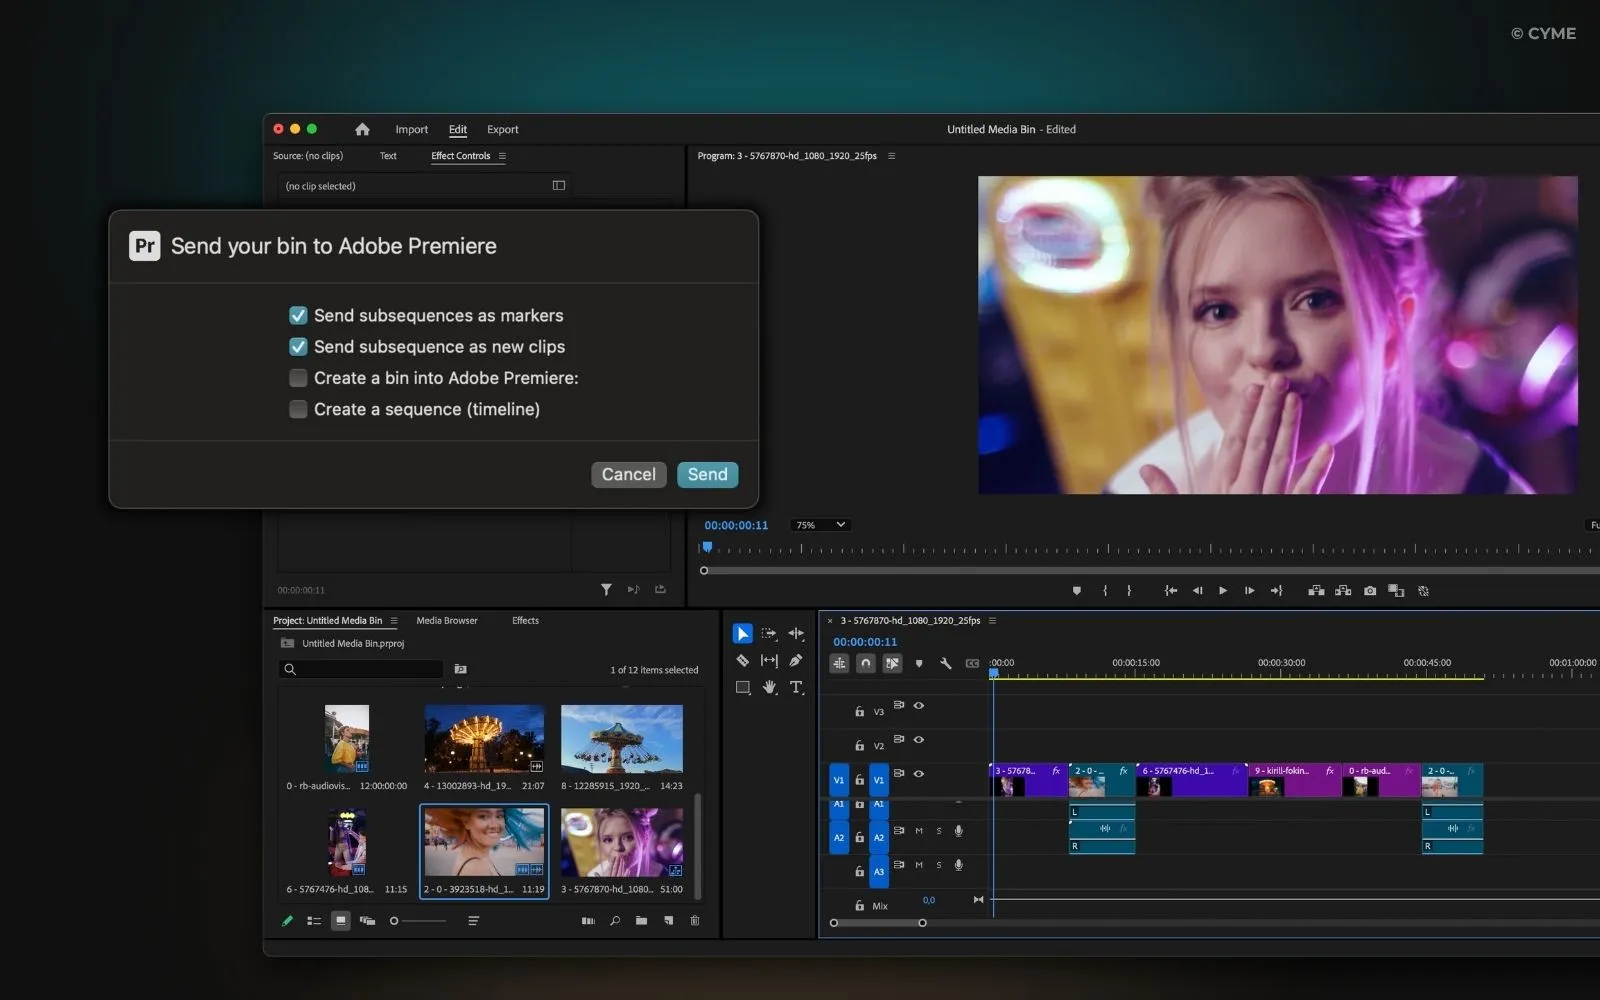
When your bin is ready:
- Choose Export
- Select your NLE: Premiere Pro, DaVinci Resolve or Final Cut.
Peakto generates:
- A sequence (timeline) referencing your selected subclips
- An XML that points to the full original files
This workflow gives editors the best of both worlds:
- Fast pre-editing done in Peakto
- Frame-accurate finishing in the NLE
- The ability to add/remove seconds as needed, since full clips are referenced
- Zero duplication, zero relinking issues
It’s a clean, professional handoff.
Why Peakto Delivers Massive ROI for Video Creators
Using Peakto for pre-editing:
- Eliminates hours of footage searching
- Allows teams (even non-editors) to prepare structured pre-edits
- Reduces back-and-forth between project managers and editors
- Prevents lost assets and duplicate media copies
- Speeds up the start of every editing project
- Unlocks huge archives thanks to AI scene and dialogue search
- Creates a smooth pipeline to Premiere Pro and DaVinci Resolve
In practical terms: Peakto lets you deliver more videos, faster, with less frustration — while keeping everything local, private, and organized.
If you want a showreel, a project draft, or a client-validated pre-edit without wasting precious editing time, Peakto becomes indispensable.